Showing posts with label vBulletin Tutorials. Show all posts

Thursday, September 5, 2013

Tutorial How to Create Forums On vBulletin

Tutorial How to Create Forums On vBulletin. For novice users vBulletin and confused how to create a new sub-forum, you can follow the tutorial and the way that I will give below. Follow the instructions correctly to avoid errors. If you would like to create new forum threads on your forum, please refer to the 

  • administrative control panel
  • Forums & Moderators
  • Forum Manager

Tutorial How to Create Forums On vBulletin


On the new page, please input the new forum thread name and description. Additionally, you should select if the new forum will be published under an already existing one of it will have no parent one.

 
Tutorial How to Create Forums On vBulletin


If you would like to administrate and rearrange your already existing forums you can perform this via your Forum Manager under the Forums and Moderators menu on the left.


Tutorial How to Create Forums On vBulletin


Sunday, September 1, 2013

Getting To Know And Admin Control Panel On vBulletin 5.0

Getting To Know And Admin Control Panel On vBulletin 5.0. The first thing you will see when you log into the Admin Control Panel is the welcome page. This page contains a quick method to search for users, phrases, PHP functions or MySQL language as well as some useful links, information about your server and the vBulletin credits.

Getting To Know And Admin Control Panel On vBulletin 5.0


You will notice that the Admin Control Panel is divided into three distinct areas. The first and most obvious of these is the main panel, which currently shows the home page. This area (the main panel) is where the majority of your attention will be focused when administering your board.

At the top of the page is a tab bar with a link to the Site Home Page (the starting point of the public area of the board). To the right of the tab bar is a link to the messages page for your admin user and a link allowing you to log out of the control panel. Directly below the open Admin CP tab is a narrow strip that contains information about the vBulletin version you are currently running and the latest version available to download. To the right of the strip is a search box allowing you to search the forums.

Getting To Know And Admin Control Panel On vBulletin 5.0


To the left of the page is the navigation panel. This long, thin area is the key to getting around the Admin CP.

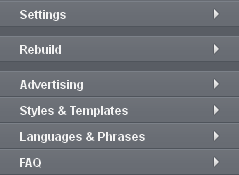
When you first visit the Admin CP, you will notice that all the sections of this panel are in a collapsed state.

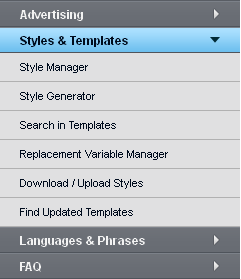
You can click the gadget on each section to expand it and show its contents, and click the gadget again to collapse that section again. Double-clicking a section's title will also toggle its state and either expand or contract it.

Getting To Know And Admin Control Panel On vBulletin 5.0vBulletin

You can expand and collapse any sections at any time. You are not limited to having just a single group expanded at any one time.

When you have a section or sections expanded, hovering your mouse over the included links will highlight that link. You can then click to open the corresponding page in the main panel.

You can use the expanding and contracting sections to build a customized control panel layout for yourself. For example, you may find that you regularly use the 'Styles & Templates' tools, but very infrequently use the FAQ manager.


When you have established a set of expanded and collapsed sections that suits your way of working, you can save the state of the sections by clicking the [Save Prefs] button.

When you reload the Admin CP, you will find that the sections in the left navigation panel will have automatically expanded and collapsed in the manner that they were when you clicked the [Save Prefs] button.

You can expand and collapse any section in your administration session, and at any time you can click the [Revert Prefs] button, which will revert the expanded/collapsed state of all the sections to how they were when you saved your preferences.

If at any time you want to return to the home page of the Admin CP, clicking the [Control Panel Home] button at the top of the navigation panel will do this.

How To Easily Show A Banner After The First Post In A Thread

How To Easily Show A Banner After The First Post In A Thread. To display a banner after the first post is actually very easy to do in a vbulletin based websites, therefore today I will give seidkit overview and tutorial on how to display a banner in the first post. For that please you can follow the way - my way below correctly and appropriately.

Here are the instructions:
  • Admin CP
  • Styles & Templates
  • Style Manager
  • « » 
  • Postbit Templates
  • postbit or postbit_legacy (depending on which layout you are using)

Add thecode to the very bottom of the template:
<vb:if condition="$post[postcount] == 1">

<div style="padding: $stylevar[cellpadding]px 0px 0px 0px">

<table class="tborder" cellpadding="$stylevar[cellpadding]" cellspacing="$stylevar[cellspacing]" border="0" width="100%" align="center">
<tr>
 <td class="thead" align="left">Sponsored Links</td>
</tr>
<tr>
 <td class="alt1" align="center">
  BANNER CODE HERE
 </td>
</tr>
</table>

</div>
</vb:if>


Replace the BANNER CODE HERE with your own banner / ad code.


Here are several other conditions you can use in the above code to show the banner in different places. Simply replace the first "vb:if" statement.
...after the first post on every page (instead of just the first page):
<vb:if condition="$post[postcount] % $vboptions[maxposts] == 1">


...after the first post, but only for guests:
<vb:if condition="$post[postcount] == 1 AND !$bbuserinfo[userid]">


...after the first post, but only if the thread has at least 2 replies (so you never see a banner and only 1 post):
<vb:if condition="$post[postcount] == 1 AND $GLOBALS[threadinfo][replycount] >= 2">


...after the first post, but only in specific forums (where X,Y,Z is a comma list of forumids):
<vb:if condition="$post[postcount] == 1 AND in_array($GLOBALS[forumid], array(X,Y,Z))">


...after every X posts (replace X with a number):
<vb:if condition="$post[postcount] % X == 0">


...after the last post on every page:
<vb:if condition="$post['islastshown']">


You can use pieces of these conditions to do different combinations. For example, this condition will show the banner after the first post on every page (instead of just the first page), but only for guests, and only in certain forums (where X,Y,Z is a comma list of forumids):
<vb:if condition="$post[postcount] % $vboptions[maxposts] == 1 AND !$bbuserinfo[userid] AND in_array($GLOBALS[forumid], array(X,Y,Z))">

How To Easily Show A Banner After The First Post In A Thread


It is How To Easily Show A Banner After The First Post In A Thread, may be useful and good luck!

Wednesday, August 28, 2013

How To Easily Group Name Colors On vBulletin

How To Easily Group Name Colors On vBulletin.  This is one of the easiest things in vBulletin - just posting this for our beginner. This post will discuss easy and practical way to change the color of names in vBulletin. Please follow the instructions and tutorial correctly below.

Follow the tutorial below :
  • Go to AdminC
  • Usergroup
  • Usergroup Manager
  • Edit usergroup. You have to do this for each usergroup that you like to be colored.
  • Add this code in username HTML Markup

Html to be replaced and can be used to change the color of names such as

First Box :
<span style="color: XXXX;"> 

Next colour html check :
Replace code "XXXX" with your color name/code, phrase colour html check at www.w3schools.com for a HTML Color Table.

Second Box :
</span>

next save it and you're done


Added more elaborated content, just expand this spoiler.
First Box: <span style="color: red;">
Second Box: </span>
= username

First Box: <span style="color: green;">
Second Box: </span>
= username

First Box: <strong><span style="color: red;">
Second Box: </strong></span>
= username

First Box: <strong><span style="color: green;">
Second Box: </strong></span>
= username


How To Easily Group Name Colors On vBulletin


How To Easily Group Name Colors On vBulletin, that may be useful to You. Good luck!

Monday, August 19, 2013

How To Install A Style On vBulletin

How To Install A Style On vBulletin. Alright, so I understand that many users have questions pertaining how they should install themes and most of the time it is newbies who are doing it the first time. Installing a style to your website is quite easy and takes only a couple minutes depending on the size. Below are some instructions/Hints/Tips.

  • Find the theme you want! This can take time for some like myself. Find one that fits your site the best and the topic.
  • Download the style, open the .ZIP/.RAR file and see if it includes a "README" or something similar. If it includes one, then you are good to go, just follow the instructions.
  • Almost 99.9% of the time, you will take the file that says "Upload" and place whats inside in your Vbulletin folder/site location in the FTP.
  • Take the XML file that is included and place it on your desktop. This will help you for easier access to it for later steps.
  • Go on your site to the AdminCP>Styles & Templates>Download/Upload Style>Import Style XML File (located at the bottom.
  • Browse for the XML which you placed on your Desktop.
  • Click Import at the bottom if you do not need to click anything else.
  • Now your theme/style is on your site and ready to be made default or be edited.

To make your style default
  • Maneuver to Settings>Options>Style and Language Settings>Default Style
  • Select the theme you just uploaded's name.
  • Click "Save" at the bottom.

Image Tutorial of uploading a style

The typical inside of a .RAR file of a downloaded style.

You will extract these files to the FTP of your site. Commonly it will just be images that need to be placed in the FTP.
Take this XML file and move it to your desktop.


Go to your AdminCP on your site and click on Styles & Templates
Click on Download/Upload Styles


Browse for the XML you placed on your desktop inside the section above, Click on import at the bottom.

If you want to set it default, go to Settings>Options
 Click on Styles and Language Settings
Move to "Default Style" and set it to the style you just made.

 Move to the bottom and click "Save"


Sunday, August 18, 2013

How To Set Forum Under Maintenance On vBulletin

How To Set Forum Under Maintenance On vBulletin. If you are going to perform global website changes or you would like to temporary disable your forum you can achieve this via the vBulletin administrative panel by referring to the vBulletin Options menu. From the settings list, please click on the Turn your vBulletin on and off and click on the Edit Settings button.


How To Set Forum Under Maintenance On vBulletin


On the new page set the Forum Active directive to No and apply your Reason For Turning Forum Off – be advised that this is the message that will be displayed to your visitors when they access your forum.
You can proceed by clicking on the Save button on the bottom of the page.

How To Set Forum Under Maintenance On vBulletin


It is very easy and handy How To Set Under Maintenance Forum On vBulletin, good luck and hopefully useful to you all

Saturday, August 17, 2013

How To Install vBulletin [RETAIL]

How To Install vBulletin [RETAIL].  Prior to install vBulletin forum, you have to create a MySQL database and add a user with all privileges to it.

This will create a database in the format of cpanelusername_databasename, where cpanelusername is your cPanel account login username. Databasename is the name you have typed for your database. Now scroll down to Users. Enter a username and password, and then click Add User.

This will create a username in the format of cpanelusername_username, where cpanelusername is your cPanel account login username , and username is the one you have just created for your new database. Please, scroll back up to locate the two drop down boxes with a button that says [Add User to Db]. In the drop-down select box on the left, choose your newly created username, and in the box on the right, choose your newly created database. Click Add User to Db.

When you are ready you can download the installation package of vBulletin via your member`s area accessible at: http://members.vbulletin.com/ When you have your vBulletin installation package downloaded on your local computer, please extract the content on your local computer. In the newly created folder you will find a directory called ‘’Upload’’. In the upload folder you will find a directory called ‘’includes’’. Please open this folder and locate the file called config.php.new. This file should be renamed to config.php. When you have the file renamed, should open it with your favorite text editor and locate the following lines:
$config['Database']['dbname'] = 'forum';
$config['MasterServer']['username'] = 'root';
$config['MasterServer']['password'] = '';

You should change your database name and username as well as input your database password on the lines above. If your database and username are called ‘’example_vb’’ you should change the lines to the following:

$config['Database']['dbname'] = 'example_vb';
$config['MasterServer']['username'] = 'example_vb';
$config['MasterServer']['password'] = 'password';


Then you should save the file in order to preserve the changes. Now you are ready to upload the installation files of your vBulletin forum. All the content of the Upload folder should be uploaded to your account under the directory where you would like to have vBulletin installed. You can upload the content from your local computer to your public_html (or the desired subdirectory) using your favorite FTP client

As soon as the vBulletin files are uploaded you can access the installation wizard at http://yourdomain.com/install.php. On the first page you will be asked to provide your Customer Number which is your vBulletin member’s area username.

How To Install vBulletin [RETAIL]

On the next step you can click on the Next Step button and proceed with the installation process.

How To Install vBulletin [RETAIL]
 
 
The first step of the installation will verify the existences of the config file and if it is readable. If you have properly followed the all the steps above you should be displayed with the following message: ‘’ Config file exists and is readable.’’ This means that you can safely proceed with the installation by clicking on the Next Step button. On the second step vBulletin will check your database. If all the settings have been properly applied in your config file as advised above you should be displayed with the following message:


How To Install vBulletin [RETAIL]

Please click on the Next Step button in order to proceed with the installation. The third step will populate the vBulletin database with all tables required. When the following message is displayed on the bottom of your page you can proceed by clicking on the Next Step button: 

How To Install vBulletin [RETAIL]

During the next step vBulletin will apply the session and language type after which you can proceed by clicking on the Next Step button.

How To Install vBulletin [RETAIL]

During the next step the installation wizard will populate the vBulletin database with the default data. On the sixth and seventh step the master language file will be imported as well as the default vBulletin style. When the ‘’ Okay’’ message is displayed, please proceed with the installation. The eighth step of the installation will import the admin help manual which will be accessible via your admin panel after the installation.

Next you will be asked for some default settings – please input your forum name as well as your email address.
 
How To Install vBulletin [RETAIL]

On the next page you can proceed by clicking on the next step button. Next you will be asked to input the desired administrative username, password as well as the email address that will be set for the admin account.


The next step will create the administrative account for you after which you can click on the Next Step button. You will be displayed with a message informing that the installation has been successfully completed. Please note that you will need to remove install/install.php file from your account in order to activate the vBulletin forum. You can perform this via your cPanel -> file manager -> navigate to your vBulletin installation folder, select the install.php file and delete it. On the other hand, you can use your favorite FTP client to remove the file in question.

How To Install vBulletin [RETAIL]

 It is How To Install vBulletin [RETAIL], may be useful for you!